Lord D loves raisin bread, but commercially made loaves are so small, expensive and full of ingredients you can’t pronounce which help keep it soft. I have bought from a bakery before, but if a baker can make it, why can’t we? This is a simple recipe without any expensive ingredients to get some practice on making bread. It really is not that hard.
Put your second loaf in the freezer to keep from devouring it all at once. But your raisin bread isn’t just for breakfast anymore. Since there are no preservatives, after a day or two, it will dry out, lending it as a perfect base for other dishes. Use it in your apple charlotte, for canapes, or if you like to continue on the breakfast theme for french toast, or “eggy bread” as the Brits call it. When the bread gets too dry, make bread cubes and store for stuffing.

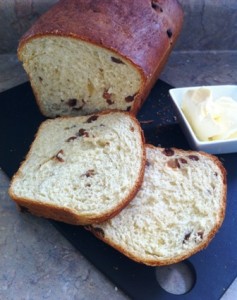
Makin Raisin Bread
Ingredients
- 1/2 cup warm water
- 1 tsp. sugar
- 2 tbsp. traditional yeast*
- 1 cup milk scalded and then cooled to lukewarm
- 1 1/2 tsp. salt
- 1/2 cup honey
- 1/2 cup melted butter
- 3 cups raisins
- 2 large eggs
- 5.5 to 6 cups unbleached flour

Instructions
- Proof: Pour 1/2 cup water into a small glass measuring cup or glass. Add 1 tsp. sugar, but don’t stir. Slowly sprinkle the yeast into the water, making sure each particle gets wet. Don’t stir. Wait 10 minutes until the yeast is thick and foamy.
- Mix: Whisk together milk, salt, honey, eggs and 1 cup of flour in a large ceramic bread bowl. Add raisins and stir with a wooden spoon.
- Add Flour: Add the remaining flour one cup at a time to make a soft dough. Coat the dough with flour before turning it over onto the kneading surface.
- Knead: Dust the kneading surface with flour before adding the dough. Dust your hands with flour and knead the dough for 10 minutes (12 minutes if you are new to bread making or if you have puny upper arms like myself!).
- 1st Rising: Ater kneading, place the dough in your cleaned bread bowl which you grease with some butter, turn over the dough so the top is greased and set in a warm, draft free spot and allow to double for 2hours.Use your oven: turn the oven light on (but don’t turn on your oven), and pour boiling water into a frying pan on the lower rack of your oven. Place your bread bowl on the upper rack.
- Shape: you know when your dough has sufficiently risen if it looks like it has doubled and if you poke your fingers into the center, they come out clean. Punch the dough down, knead it briefly and let it rest a few minutes. Cut in half, shape into loaves, and place each loaf into a greased pan. Pull out any raisins sticking out as they will burn. Put the bread pan back in its warm happy place so it can double again which should take another 45 minutes.
- Bake: Optional- mix some melted butter with cinnamon and brush the tops of the loaves. Preheat your oven (remember to take out the frying pan before you turn on the oven) to 400 F and bake for 10 minutes. Reduce the heat to 375 and bake for a further 20-25 minutes.
- Cool: Immediately turn out the dough out of the pans and tap the bottom of the loaf. If it sounds hollow, it is done. If it sticks are you are trying to take it out, it likely is not done. As a double check, insert a toothpick through the bottom and it should come out clean. Let cool on baking racks.
- Slice and Enjoy: I am not a big fan of electric knives but they are the perfect tool to cut the bread if you wish to have it hot. Otherwise use a serrated knife when the bread has cooled. Turn the bread on its side to help you make even slices.