Animal crackers have been a beloved snack for generations, capturing the hearts of children and adults alike with their charming animal-shaped designs and nostalgic crunch. These iconic treats represent more than just a simple cookie – they’re a delectable piece of American culinary heritage that has evolved from a circus-inspired novelty to a pantry staple loved worldwide.
The story of animal crackers begins in the late 19th century, when bakers in England and the United States started experimenting with playful, shaped cookies that would delight young consumers. Stauffer’s Biscuit Company, founded in 1871 in York, Pennsylvania, is often credited with popularizing these whimsical treats in the United States. However, it was Nabisco’s introduction of Barnum’s Animals Crackers in 1902 that truly revolutionized the market.
The Circus Connection
Inspired by the traveling circus culture of the early 1900s, Nabisco’s animal crackers came in a now-famous circus wagon-styled box, complete with a string handle that made them perfect as a Christmas tree ornament. This ingenious packaging transformed the crackers from a simple snack into a cultural phenomenon, bridging the gap between food and entertainment.
Crafting Your Own Animal Crackers at Home
While store-bought versions remain popular, many home bakers are rediscovering the joy of creating these delightful treats from scratch. Homemade animal crackers offer a unique opportunity to connect with culinary traditions while controlling ingredients and avoiding preservatives.
The Art of Shaping
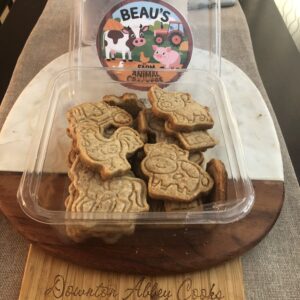
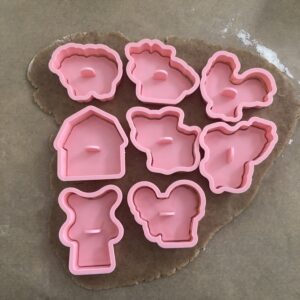
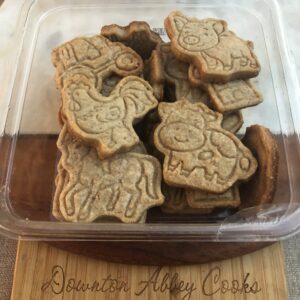
Creating animal-shaped crackers requires patience, creativity, and the right tools. Specialty cookie cutters in various animal shapes – from lions and elephants to giraffes and monkeys – allow bakers to recreate the classic charm of commercial animal crackers. My grandsons love dinosaurs and farm animals so I use those shapes. The key lies in achieving that perfect balance of crisp texture and subtle sweetness.
Cultural Significance Beyond the Snack
Animal crackers have transcended their role as a mere snack. They’ve become a cultural touchstone, representing childhood innocence, playful eating, and a connection to culinary traditions. From school lunchboxes to nostalgic adult snacking, these crackers continue to evoke memories and bring smiles.
Nutritional Evolution
Modern animal crackers have undergone significant transformations. Today’s versions range from traditional sweet varieties to organic, whole-grain options that cater to health-conscious consumers. Artisan bakeries and home cooks are continually reimagining these classic treats, experimenting with alternative flours, natural sweeteners, and innovative flavor profiles.
Sustainability and Artisan Approaches
The current culinary landscape sees a growing trend of small-batch, locally produced animal crackers. Artisan bakers are focusing on sustainable ingredients, minimal processing, and unique flavor combinations that honor the traditional concept while appealing to contemporary palates.
A Timeless Treat
Animal crackers represent more than just a snack – they’re a culinary journey that connects generations. Whether purchased from a store or lovingly crafted in a home kitchen, these whimsical cookies continue to capture our imagination and satisfy our sweet tooth.
As food trends come and go, animal crackers remain a testament to the enduring appeal of playful, creative cuisine. They remind us that sometimes, the most memorable foods are those that bring a touch of joy and wonder to our everyday lives.
Animal Crackers
Equipment
Ingredients
- 2 cups whole wheat flour
- 1 tsp baking powder
- 1/4 tsp ginger
- 1/4 tsp nutmeg
- 1/2 tsp cinnamon
- 1/3 C honey
- 1/4 C coconut oil melted
- 5 Tbsp butter at room temperature
- 1 egg
- 1 tsp vanilla extract
- 1 tsp almond extract
Instructions
- Whisk together the flour, baking powder, and spices in a medium bowl. Set aside.
- Using the paddle attachment on your stand mixer, cream together the honey, coconut oil and butter until well blended, about 3 minutes.
- Add the egg and both extracts, one at a time, letting each mix in before adding the next.
- Turn the mixer down to low and slowly add in the flour mixture. Continue to mix on low until all the flour is incorporated and the dough comes together. Remove bowl from mixer and use your hands to press together the dough if necessary.
- Take the dough out of the bowl and divide it in thirds. Wrap each third in plastic wrap, flatten slightly into a disk, and chill in the refrigerator for at least 1 hour (or up to 24 hours).
- After the dough has chilled, take out one of the disks and let stand on the counter for 5 minutes. Preheat your oven to 350°.
- Lightly dust your countertop or work surface with flour. Remove the dough from the plastic wrap and dust each side with flour. Roll the dough to a quarter inch thickness. Dust your cookie cutters with flour, cut out the shapes from the dough, and transfer them to a baking sheet topped with parchment paper. Press the scraps back together and repeat.

- Bake the cookies one sheet at a time for 10-12 minutes or until just starting to darken at the edges. Let cool 5 minutes before transferring to a wire rack or your belly or both.
- Continue to cut and bake cookies until you’ve used all the dough.
- Keep the cookies in a container at room temperature until you’ve gobbled them up or about a week, whichever comes first.


